|
…
|
||
|---|---|---|
| .. | ||
| config.h | ||
| keymap.json | ||
| readme.md | ||
Aurora Sweep's Default Keymap
This keymap is a copy of the Ferris default keymap, with the addition of RGB modifier keys.
A usable default keymap for the Ferris keyboard
Keymaps in general are quite personal, so it is difficult to come up with a default that will suit every user.
This keymap makes heavy use of keys behaving differently when tapped and held, so that all the keys one may need remain accessible despite the low number of thumb keys.
It comes with a number of layers to give access to most of the keys one may need on a keyboard. It is not meant to be the best possible keymap, but rather a good base on which to build a keymap that works for you.
This is not the only way to make 34 keys a comfortable typing experience, but it is one way to do so. If you don't already know of a better way, this may be as good a starting point as any :)
Note that this keymap was built from the perspective that it is OK to take a steep learning curve if it results in a keymap that is easier to use in the long run. This means that it may take more effort to learn this keymap than some alternatives. "Easy to use" was assessed against the workflow of the author, so your mileage may vary on some of the details.
What do all these layers do?
Layer 0: Base layer
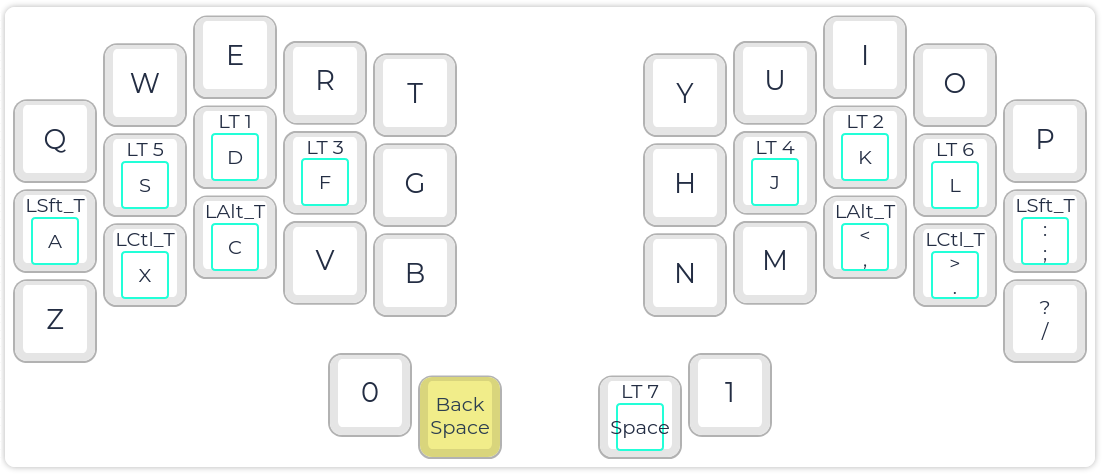
On tapping the keys, our base layer is qwerty with space on the right homing thumb and backspace on the left homing thumb.
In this layer, the non-homing-thumb positions have 0 and 1. I recommend modifying this to some frequently accessed shortcut such as copy/paste, previous/next tab or anything that makes most sense in your own workflow. O and 1 are place-holders and make it easy to troubleshoot that all keys are working properly before soldering in the switches. The reason I recommend convenience shortcuts instead of more commonly used keys like tab or meta is that unhoming of the thumbs was a frequent source of typos for me when I used more than one thumb key frequently in the context of typing.
Despite being missing on this layer, "meta", "tab", "esc" and such are accessible from any other layer: see Layer 7.
The behaviour of some keys differ when held:
-
Both homing pinkies behave as shift.
-
Both bottom-row ring fingers behave as ctrl.
-
Both bottom-row middle fingers behave as alt.
-
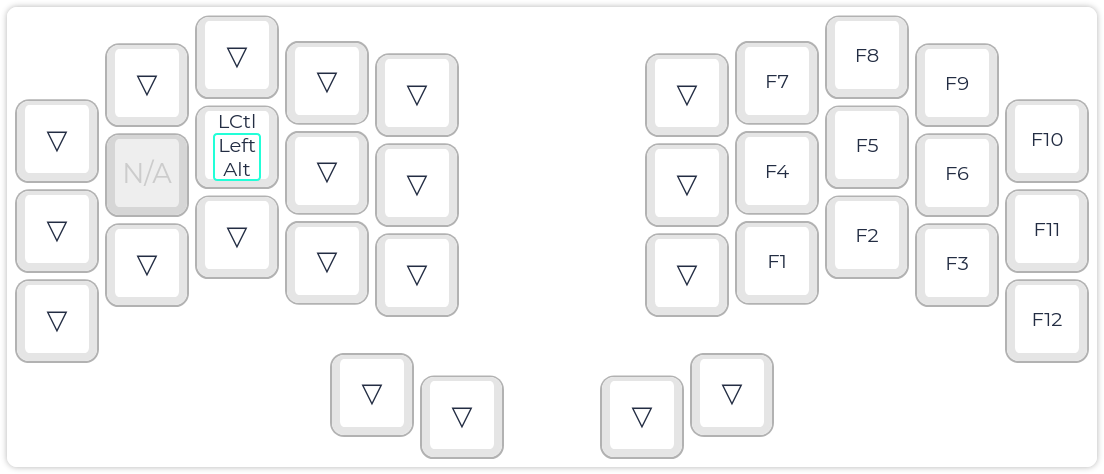
The homing left ring finger gives access to the Function keys layer
-
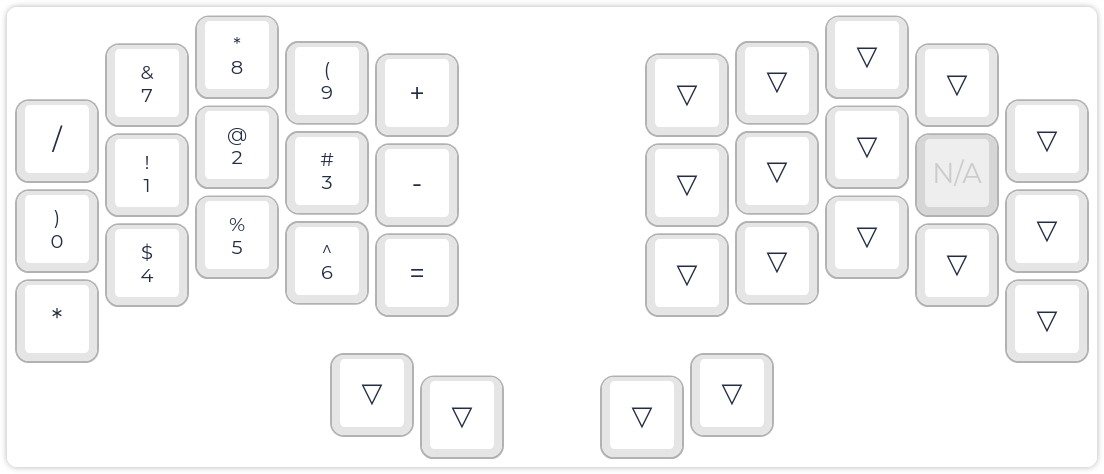
The homing right ring finger gives access to the Numbers layer
-
The homing left middle finger gives access to the Mouse layer
-
The homing right middle finger gives access to the Navigation layer
-
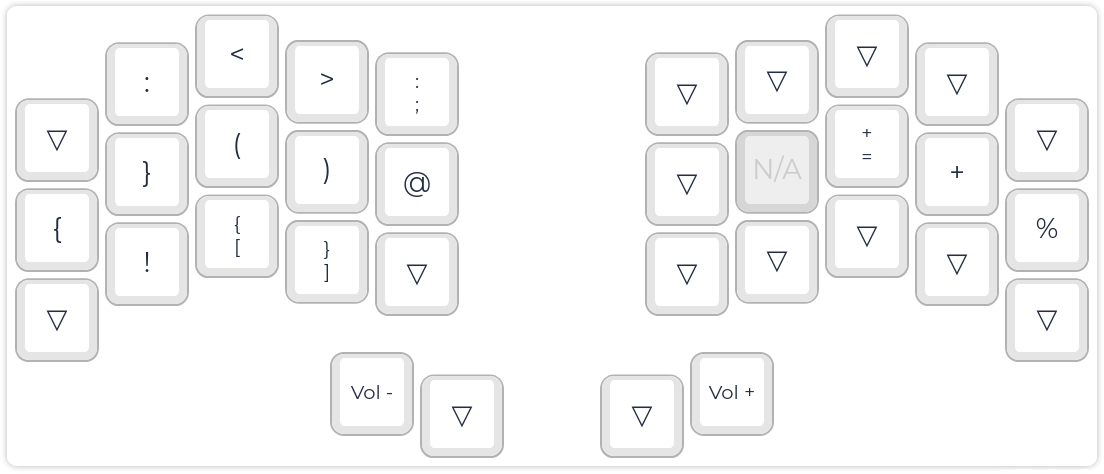
The homing left index finger gives access to the Right symbols layer
-
The homing right index finger gives access to the Left symbols layer
-
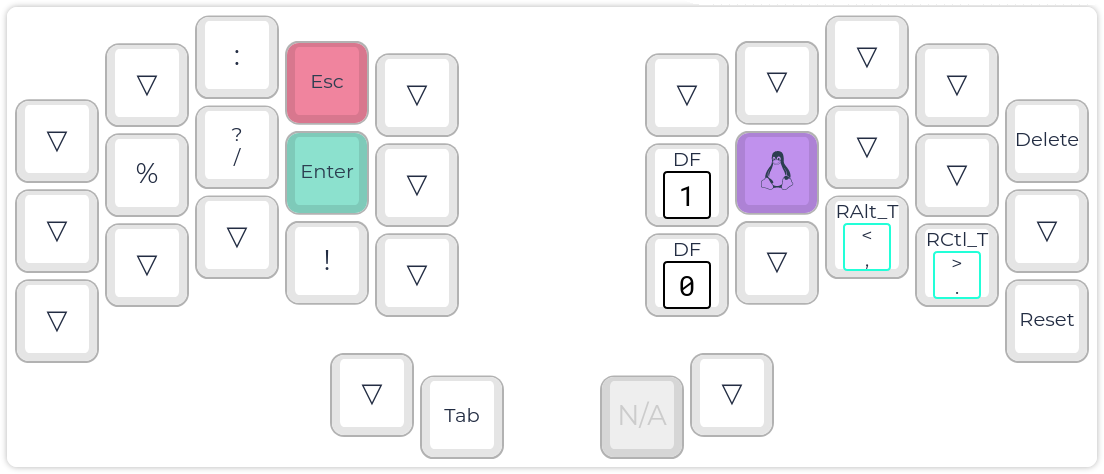
The homing right thumb gives access to the Always accessible layer
Layer 1: Mouse
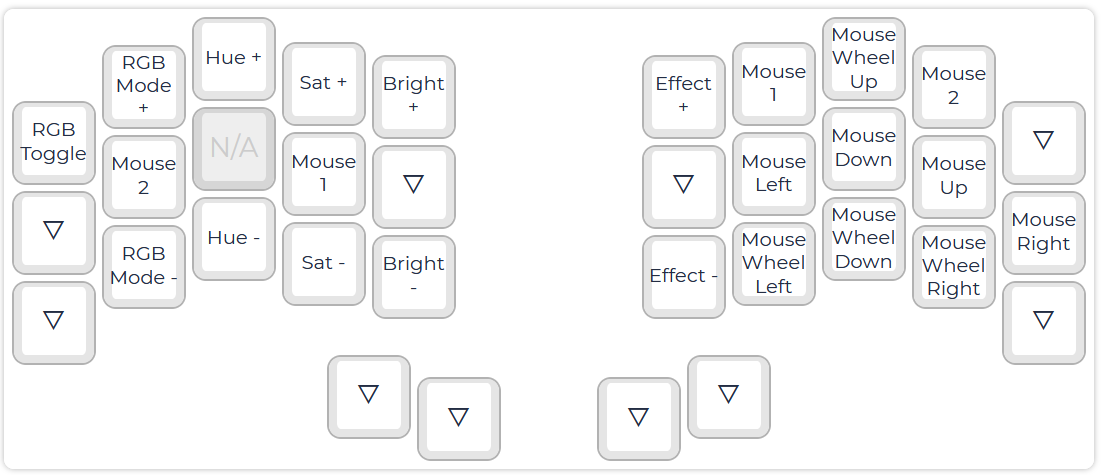
Layer 1 is a mouse layer: it can be used one-handed or two-handed. The most common way to use it is two handed, with left and right click on the homerow of the left hand and directions on the homerow of the right hand. Scrolling is available on the right hand with mid finger up and down for vertical scroll and index and ring finger down for horizontal scroll. On the right hand, left click and right click are also available with index and ring finger up to allow one handed operation. This can be particularly handy when enabling the mouse layer permanently (no need to hold the left middle finger), which can be done from Layer 7.
Addition: The Aurora Sweep allows the RGB settings to be modified on this layer. This is an extra feature over the default Ferris / Sweep keymap.
Layer 2: Navigation
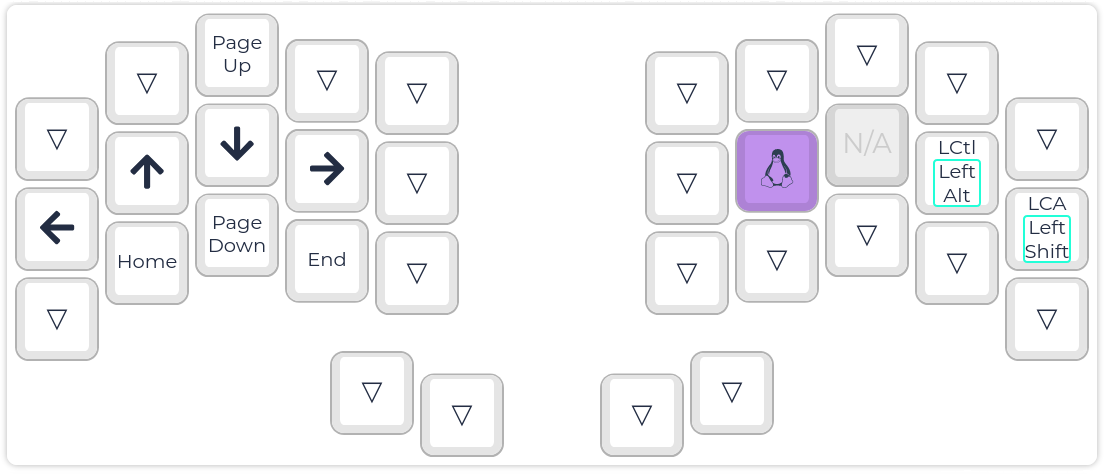
The navigation layer somewhat mirrors the mouse layer. It is accessed by holding the right middle finger and gives access to arrow keys on the left homerow. Page up and down, Home and End mirror the vertical scrolling and horizontal scrolling on the mouse layer.
On the right hand, in addition to ctrl and alt which are available through transparency, ctrl + alt, ctrl + alt + shift and meta are accessible on the homerow to enable common shortcuts in some window managers. This part is quite workflow dependent, so make sure to adapt it to your own workflow as appropriate.
Layer 3: Right symbols
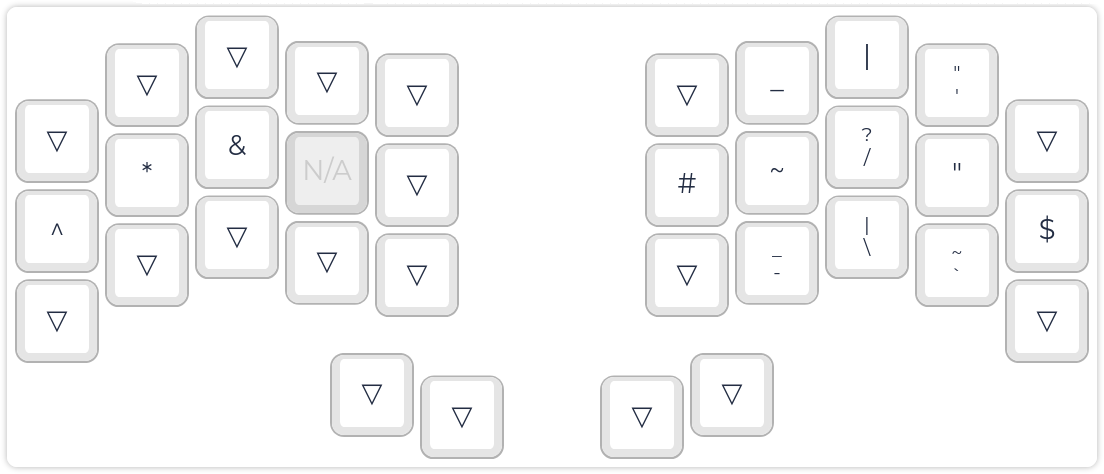
When holding down the left index, one may access about half of the symbols. The pinkies store ^ and $ symbols that represent begin and end in vim. The left homerow hosts * and &, symbols which are related in the way that they represent some form of indirection in programming languages such as rust. On the right hand, most symbols used when navigating the command line are stored together, organized by columns of related symbols.
Layer 4: Left symbols
When holding down the right index, one may access the other symbols. On the left hand, most of the different brackets are laid out. The most frequent ones (round brackets and curly brackets) get a spot on the homerow. The rest of the layer hosts the remaining symbols that are easier to access here than on any other layers.
Layer 5: Function keys
By holding down the left ring finger, one may access the function keys, roughly in a numpad layout. This means that alt+F4 is easy to type, with F4 being on the homerow. There is a shortcut for ctrl+alt on the left hand to enable convenient switching between virtual terminals on Linux.
Layer 6: Numbers
The number layer is accessed by holding the right ring finger. It hosts the numbers and some duplicated symbols that are commonly accessed next to numbers, such as mathematical operators. The number are layed out similarly to a numpad, but with the middle row and the homerow swapped so that the most used numbers: 0, 1, 2 and 3 are all available in homing positions.
Layer 7: Always accessible
Layer 7 is accessed by holding the right homing thumb down. Because this position is left transparent from every other layer, this layer is always accessible. It gives access to some essential keys that would typically be accessed on a thumb cluster or pinkies, such as meta, enter, tab, esc and delete.
As the layer hosting esc, we duplicated some symbols here to allow for fast navigation in vim. For instance, esc, :, w, q can be done in a single roll.
Where is the keymap.c?
The keymap.c file is not published to the repository. It is generated from keymap.json by the build system.
This avoids duplicating information and allow users to edit their keymap from the QMK Configurator web interface.
How do I edit and update the keymap?
The keymap.json file is generated from the QMK Configurator interface and formatted for better readability in the context of the Ferris keyboard.
To edit it, you may:
- Edit it directly from a text editor.
- Edit it from the QMK Configurator.
If you decide to use the latter workflow, here are the steps to follow:
- From the QMK Configurator, hit the "import QMK keymap json file" button (it has a drawing with an up arrow on it).
- Browse to the location of your keymap (for example,
<your qmk repo>/keyboards/splitkb/aurora/sweep/keymaps/default/keymap.json) - Perform any modification to the keymap in the web UI
- Export the keymap to your downloads folder, by hitting the "Export QMK keymap json file" button (it has a drawing with a down arrow on it)
- Replace your original keymap with the one you just downloaded
Note: At the time of writing (the 24th of October 2022), not every feature used in the default keymap is supported by the QMK Configurator. You cannot yet upload the default keymap.json due to a file format mismatch - use the "Load Default" button to load the default keymap instead. Additionally, custom configuration options are still being worked on: if your keymap depends on them, please compile your firmware offline for now.
I want to do more than the JSON format supports!
While the json format is easy to use, it does lack certain functionality - most notably custom OLED or encoder behaviour.
To add this, you need to convert it to the c format. Do keep in mind that this is generally a one-way operation.
First, from the root of your qmk repo, move to your keymap folder
cd ./keymaps/splitkb/aurora/corne/my_personal_keymap
Next, convert your keymap.json to a keymap.c
qmk json2c -o keymap.c keymap.json
You can add custom C code to the newly generated keymap.c file. Do note that you have to use either a C file or a JSON file - you cannot do both!
If a JSON file is present, the C file is ignored.
